


Why are the classroom issues of 2022 so draining on teachers? Of course, the high-level stressors...

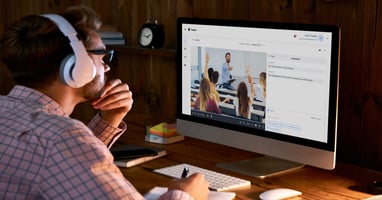
This blog contains your guide to live streaming with integrated audio for Zoom, using Swivl Robot + Teams. We will cover live streaming options, including the equipment needed as well as a complete set-up guide on how to live stream with Zoom for both USB-A and Swivl link.
Live streaming options
|
Traditional Set-up |
Standalone Set-up |
Integrated Audio |
|
|
Description |
Record or live stream with multiple microphones in the classroom |
Broadcast remote student audio using AC powered speakers connected to Swivl |
|
|
Equipment Needed |
|

|
|
Note: You can only use a USB-A cable for Integrated Audio. If your computer only has a USB-C port, you will need a USB-C adapter.
Swivl Link *wireless connection for Integrated Audio 
Integrated audio: what is it?
Integrate Swivl with the teacher's computer using a Swivl Link or USB A cable. Remote student audio will be broadcast through classroom speakers or computer speakers. Project the live stream for in-class students. Screen share digital content through the live stream.

Live streaming with Zoom: integrated audio

How to: Integrated audio set-up for Zoom (USB-A)
This video walks you through how to connect to a Zoom meeting using the integrated audio set-up and a USB-A Cable.
How to: Integrated audio set-up for Zoom (Swivl link)
This video walks you through how to connect to a Zoom meeting using the integrated audio set-up and a Swivl link.
Required equipment

- Swivl robot
- iOS lightning cable
- iOS or Android tablet
- Floor stand
- USB A – SUB cable
- PC/laptop
Integrated audio - Zoom
First time set-up: Install Zoom and Teams by Swivl apps on your device


1. Connect the mobile device to the robot.
Press and hold down on the power button to turn on the robot.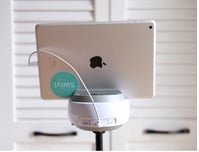
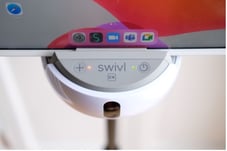
2. Tap "Allow" to enable robot access
3. Turn on markers by pressing the power button.
*IMPORTANT*
If prompted, update the firmware.
C-Series Robot firmware is version 10.04.08 or higher.
CX Robot firmware is version 12.02.04 or higher.
Integrated audio - Zoom (Link)
First time set-up for Swivl Link:
1. Remove charging cable from robot base during Swivl Link pairing. Do not press the red button at any time. This will cancel the pairing procedure.
2. Open the Settings tab, select Base Port Configuration, and choose To Link.

3. Connect the Swivl Link to the USB port on the robot base. The firmware for your Swivl Link will update automatically if needed.

4. Look for a pop-up notification about Swivl Link.
-
- If the pop-up says “Marker Mode: Microphone Only”, press Change configuration.
- When the pop-up says "Wireless Connection,” select Keep current.

5. Connect Swivl Link to the computer.

Integrated audio – Zoom
6. Connect USB-A cable to your Swivl robot and computer.

Integrated audio – Zoom
7. Go to the teacher's computer. Start the Zoom session.

Integrated audio – Zoom (link)
8. At the teacher's computer, open the Zoom Microphone settings. Select “Swivl Link” as the microphone source.

Integrated audio – Zoom
9. At the teacher's computer, open the Zoom Microphone settings. Select “Swivl” as the microphone source.

10. From the teacher's computer, stop the host video. You will still be able to Screen Share.

Go to the mobile device and open the Teams app. From the Home screen, tap on Zoom in the Stream section.

Teams will remember your selection the next time you open the app and default to show you that streaming app. To find other streaming options, click on “Other Apps”.
Tap Join to join the meeting you started on your computer.

11. Either scroll down to your Meeting Room or enter a Meeting Code.

12. When you enter the meeting, Select Cancel audio or No audio.
13. Spotlight: once you have three participants in the session, spotlight the Swivl participant from the host computer.

14. Once Spotlighted, Zoom will ask you again if you want to join audio on your iOS device. Select “Later.”

Marker Muting
While live streaming, you can mute the Primary and Secondary markers at once.
- Firmly double-click the red button on your Primary marker.
- All markers will be muted.
- Markers will flash green while in mute mode.
TO UNMUTE: Firmly double-click the red button on your Primary marker.


*The information in this blog is extracted from Swivl.
About AP Tech
AP Tech is a specialist importer and distributor of video communications and streaming technology, products, and solutions. We provide IT and AV integrators with insights to help you build world-class solutions for your clients, with technical expertise and personalised service. Every solution from AP Tech is backed by local warranty and support.

